Precision Sniper
This professional-grade solution for MetaTrader 5 helps traders achieve greater efficiency in their daily workflow. This technical indicator acts as a specialized analysis tool designed to visualize market data. It helps traders identify emerging trends, momentum shifts, and key support or resistance levels by plotting statistical calculations directly onto price charts.
How to Setup and Use Precision Sniper
1. Installation: Place your file in the MQL/Indicators folder via "Open Data Folder" and restart your terminal.
2. Loading: Find the indicator in the Navigator, drag it onto your chart, and configure the input parameters in the popup window.
3. Customization: Press Ctrl+I to open the indicator list, select your tool, and click "Properties" to change colors, levels, or visual styles.
4. Updating: Replace the old file in the Indicators folder with the new version and restart the platform to apply changes.
Frequently Asked Questions
Q: Why is my indicator not showing? A: Verify the file is in the MQL/Indicators folder, or try right-clicking the "Indicators" tree in the Navigator and clicking "Refresh."
Q: Do custom indicators slow down the platform? A: Too many complex indicators can impact performance; remove unused ones via the "Indicator List" (Ctrl+I).
Q: Can I use MT4 indicators on MT5? A: No, MQL4 and MQL5 are distinct languages; ensure the indicator is compiled specifically for your platform version.
Description & Settings
PrecisionSniper
is a comprehensive MetaTrader 5 indicator designed to identify high-probability long and short trade opportunities by combining multiple technical confluences into a single weighted scoring system. Instead of relying on any single indicator, PrecisionSniper evaluates up to eight independent conditions per bar, assigns each a score weight, and only fires a signal when the combined score meets or exceeds a configurable threshold. The result is a filter-heavy signal engine that significantly reduces noise and focuses the trader's attention on setups that carry strong, multi-factor confirmation.
At its core, the indicator uses three Exponential Moving Averages (EMA Fast, EMA Slow, and EMA Trend) as the trend backbone, supported by RSI momentum, MACD histogram direction, ADX trend strength, VWAP position, tick volume surge, and an optional Higher-Timeframe (HTF) bias filter. When HTF bias is enabled, it contributes the highest single weight in the scoring system, making it particularly effective for traders who want their entries to align with the larger-frame trend. Signals are graded as A+, A, B, or C depending on the total score, and the
Grade Filter
input lets the user surface only the grades they want to trade.
PrecisionSniper includes a rich set of built-in features beyond signal generation: automatically drawn Entry, Stop Loss, and three Take Profit levels on the chart, an adaptive trailing stop that ratchets forward as each TP is reached, a structure-aware Stop Loss that anchors behind recent swing highs or lows instead of a fixed ATR multiple, and a fully featured on-chart dashboard that displays real-time market context alongside a backtest performance summary calculated directly from historical price data. The dashboard supports three backtest modes: all loaded history, a fixed date range, and a rolling window of the last N bars.
Nine trading presets are available (Auto, Scalping, Aggressive, Default, Conservative, Swing, Crypto, Gold, Custom) to instantly reconfigure EMA periods, RSI length, ATR length, minimum score, and SL multiplier for different instruments and timeframes. Auto mode selects the appropriate preset automatically based on the chart's current timeframe.
Indicator Inputs
The table below documents every input parameter, its default value, and its function.
Scoring System
Each bar is evaluated against eight conditions. The table below lists each condition, the maximum points it contributes, and the direction it applies to.
Signal grade thresholds are as follows: a score of 8.0 or above earns an
A+
grade, 6.5 to 7.9 earns an
A
, 5.0 to 6.4 earns a
B
, and anything below 5.0 earns a
C
. The Grade Filter and HideCGrade inputs work together to control which grades appear as arrows on the chart.
Built-In Preset Configurations
The table below shows the exact parameter values applied by each preset. The Custom preset uses the C_ prefixed inputs instead.
The
Auto
preset selects from the above automatically: charts of 5 minutes or less use Scalping, 6 minutes to 1 hour use Default, 1 hour to 4 hours use Aggressive, and above 4 hours use Swing.
Dashboard and Backtest Statistics
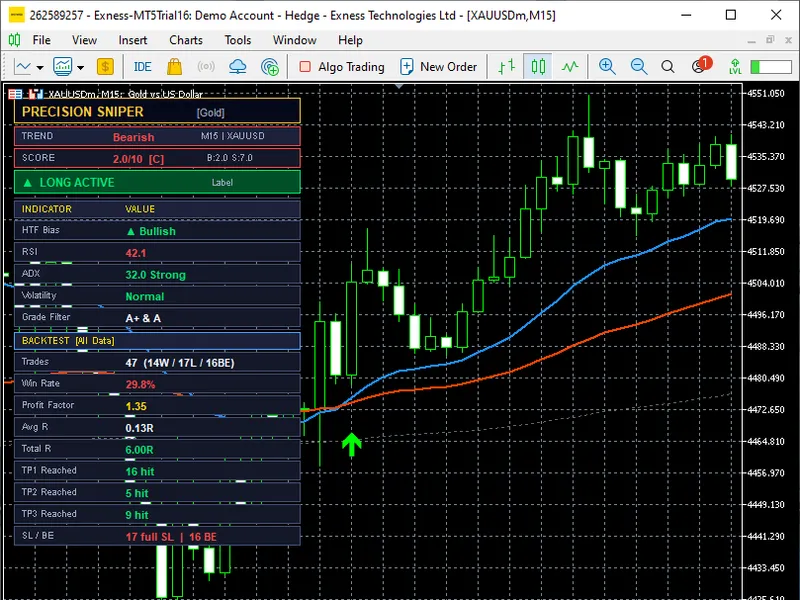
The on-chart dashboard (toggled by the Show Dashboard input) displays two sections. The upper section shows live market context including trend direction (Bullish, Bearish, or Neutral), the current signal score and grade, the active signal status (Long Active, Short Active, or Waiting), HTF bias, RSI with overbought/oversold labels, ADX with strength label, volatility regime (High, Normal, or Low based on a 42-bar ATR average), and the current Grade Filter setting.
The lower section of the dashboard presents backtest statistics computed from historical signals on the loaded chart. These statistics include total trade count broken down into wins, losses, and breakeven outcomes, win rate percentage, profit factor, average R per trade, total accumulated R, and a TP/SL breakdown showing how many trades reached TP1, TP2, TP3, or were stopped out at a full loss. The backtest engine correctly handles trades that are closed by an opposite signal (force-close) and does not count those as actual SL hits in the SL breakdown counter.
Important:
The backtest statistics shown in the dashboard are calculated from the indicator's signal logic applied to historical bars on the current chart. They do not account for broker spreads, slippage, swap fees, partial position management, or real execution conditions. Always validate performance on a demo account before applying any signals to a live trading account. Past signal performance on historical data does not guarantee future results.
How to Use
Attach PrecisionSniper to any chart in MetaTrader 5 and select a Preset that matches your instrument and timeframe. For most forex pairs on H1 or H4, the Default preset is a good starting point. For lower timeframes such as M5 or M15, try Scalping or Aggressive. For XAUUSD on the Daily chart, use the Gold preset.
To improve signal quality further, set the HTF Timeframe input to one or two timeframes above the chart you are trading. For example, if you are trading on H1, set HTF to H4 or D1. This adds a 2-point bonus only when the larger-frame trend agrees with the signal, which effectively means only A-grade or better signals survive when the HTF is misaligned. Set the Grade Filter to "A+ and A Only" if you prefer to trade fewer but higher-confidence setups.
When a buy or sell arrow appears, the Entry, Stop Loss, and TP1/TP2/TP3 lines are drawn automatically. If the trailing stop is enabled, monitor the orange dotted trail line as the trade moves through TP levels. The trail advances to breakeven after TP1, to TP1 after TP2, and to TP2 after TP3, locking in profit at each stage. Use the backtest dashboard to review recent signal statistics and adjust the Min Score or Grade Filter if the current settings produce too many or too few signals for your style.